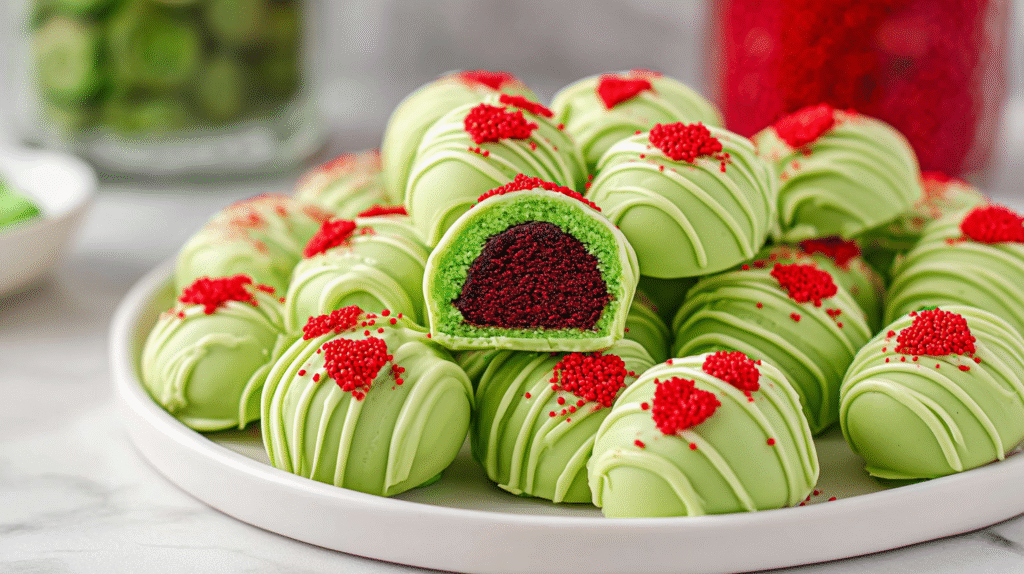
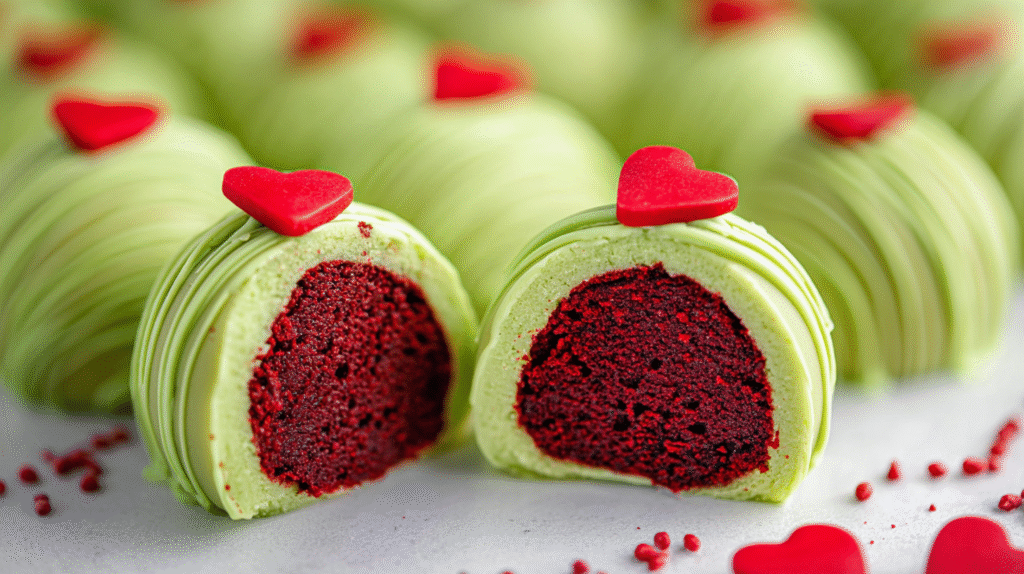
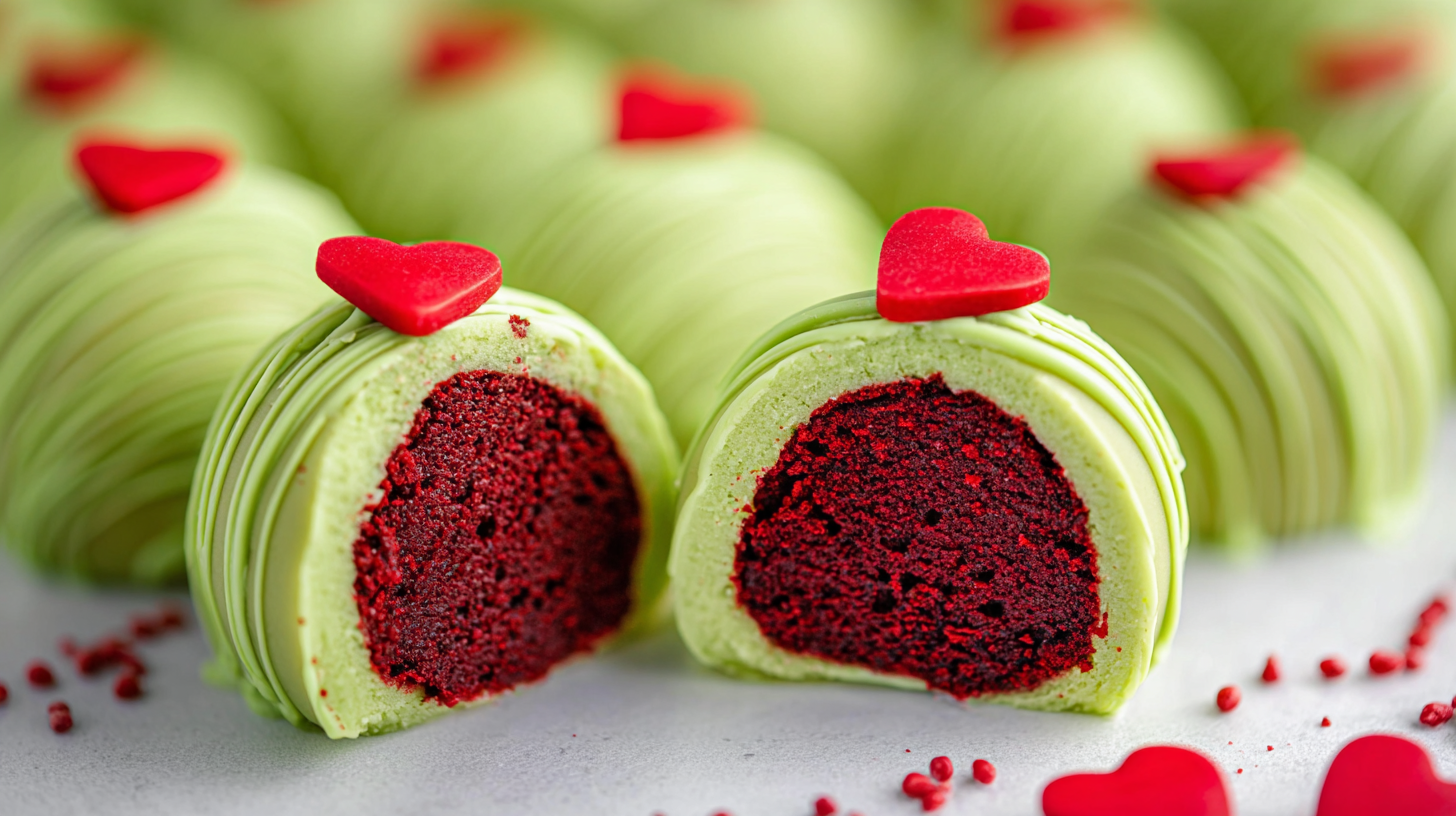
Every December, I find myself looking for desserts that feel festive without requiring me to babysit an oven for hours. That’s how these Grinch Oreo Balls became a holiday staple in my kitchen. The first time I made them, I was skeptical—could something this simple really look that cute? But when I pulled that first batch out of the fridge, covered in bright green candy melts with tiny red hearts perched on top, I knew I’d found a winner. My kids went wild over them, declaring them “better than anything from a bakery,” which is high praise coming from the same people who critique my pancake flipping skills. These treats are essentially Oreo truffles dressed up for Christmas, and the red velvet cookies hiding under all that green make them taste like the Grinch’s heart grew three sizes. They’re messy to make, sure—your hands will be covered in green by the end—but that’s half the fun. And honestly, watching people bite into one and discover that pop of red inside never gets old.
Why Grinch Oreo Balls Are Perfect for Holidays
The charm of these Grinch Oreo Balls is how little effort they require for maximum wow factor. There’s no baking involved—just mixing, rolling, dipping, and decorating. The red velvet Oreos provide the base flavor and that surprise pop of color when you bite in, while cream cheese binds everything together and adds a subtle tang that balances the sweetness. The bright green candy coating is what makes them instantly recognizable as Grinch-themed, and those tiny red heart sprinkles are the finishing touch that ties the whole look together. Kids love helping with these because rolling the dough into balls feels like playing with edible Play-Doh, and adults appreciate how quickly they come together when you’re juggling a dozen other holiday tasks.
What You’ll Need
The ingredient list is refreshingly short. You’ll need one family-size package of red velvet Oreos—that’s about 24.4 ounces, or roughly one full package. Don’t use Double Stuf or Mega Stuf versions here; they’ll make the mixture too wet and difficult to work with. Grab 8 ounces of cream cheese, and make sure it’s softened to room temperature so it blends smoothly. For the coating, pick up about 15 ounces of light green candy melts—Wilton and Melt ‘Ems are both solid brands. If you can’t find light green, regular green works fine, though the lighter shade looks more Grinch-like. Finally, you’ll need red candy heart sprinkles for decoration. These can be tricky to find in stores, but Walmart, Hobby Lobby, and Joann Fabrics sometimes carry them, or you can order them online.
Step-by-Step Instructions
Crush the Cookies
Line a large baking sheet with parchment paper and set it aside. Dump your entire package of red velvet Oreos into a food processor and pulse until they’re fine crumbs—you don’t want any big chunks left. If you don’t have a food processor, seal the cookies in a heavy-duty zip-top bag and crush them with a rolling pin. It takes a bit more effort, but it works just as well.
Mix with Cream Cheese
In a large mixing bowl, beat the softened cream cheese with an electric hand mixer on high speed until it’s smooth and fluffy—this takes about a minute. Add the Oreo crumbs and mix everything together until it’s fully combined and looks like thick, slightly sticky dough. You should be able to press it into a ball without it crumbling apart, but it shouldn’t be so wet that it sticks to everything.
Roll Into Balls
Using a small cookie scoop—a 1.5-inch size is ideal—scoop out portions of the mixture and roll them between your palms to form smooth balls. Place each one on the prepared baking sheet. You should get around 24 balls total, depending on how large you make them. Once all the balls are formed, slide the tray into the fridge and let them chill for at least two hours. This step is crucial—if you skip it, the balls will fall apart when you try to dip them.
Melt the Candy Coating
Set aside about half a cup of candy melts if you want to drizzle extra coating over the finished balls—it’s optional but looks nice. Pour the rest of the candy melts into the top of a double boiler and heat over low heat, stirring frequently, until they’re completely melted and smooth. Be patient and keep the heat low; if the candy gets too hot or any water splashes into it, it can seize up and become unusable. If you don’t have a double boiler, you can melt them in a microwave-safe bowl in 30-second bursts at 60% power, stirring between each interval.
Dip and Decorate
Remove the chilled balls from the fridge. Using a fork or toothpick, spear each ball and dip it into the melted candy, rolling it around until it’s fully coated. Lift it out and tap the fork gently on the edge of the bowl to shake off excess candy, then place it back on the parchment-lined sheet. If you’re adding the extra drizzle, melt the reserved candy melts in a piping bag or small zip-top bag in the microwave for 30 seconds, massage it until smooth, and snip off a tiny corner. Drizzle the melted candy over each coated ball in a zigzag pattern, then immediately press a red candy heart onto the top before the candy sets. Work quickly—green candy melts harden fast. Once all the balls are decorated, pop the tray back into the fridge for about 15 minutes to let everything set completely.
Pro Tips
- Let cream cheese sit at room temperature for 30 minutes to an hour before mixing
- Chill the balls for the full two hours before dipping—rushing this step causes them to fall apart
- Don’t overheat the candy melts; low and slow prevents seizing
- Use regular Oreos, not Double Stuf, to avoid overly wet dough
- Add a tablespoon of coconut oil to the melted candy if it’s too thick
- Press the red heart on immediately after drizzling while the candy is still wet
Fun Variations
- Use regular chocolate Oreos, golden Oreos, or peppermint Oreos for different flavors
- Swap the green candy melts for white chocolate tinted with green food coloring
- Skip the drizzle and just press a red heart directly onto each dipped ball
- Sprinkle green colored sugar or green jimmies over the wet candy for extra sparkle
- Use reduced-fat cream cheese if you want to lighten them up slightly
- Make them smaller for bite-sized treats or larger for a more substantial dessert
Troubleshooting Common Issues
If your dough is too crumbly and won’t hold together, add a tablespoon of softened cream cheese at a time until it binds properly. If it’s too wet and sticky, the Oreos might have been Double Stuf—try adding a few more crushed regular Oreos to firm it up. Balls that fall apart when dipping usually weren’t chilled long enough; give them an extra 30 minutes in the fridge. If the candy coating seizes and becomes grainy, it either got too hot or water got into it—start fresh with a clean, dry bowl. Candy that’s too thick to coat smoothly can be thinned with a teaspoon of coconut oil stirred in until it reaches the right consistency.
Ingredient Substitutions
- Use dairy-free cream cheese and vegan Oreos for a plant-based version
- Replace red velvet Oreos with gingerbread, peanut butter, or golden Oreos
- Swap green candy melts for white chocolate with green gel food coloring
- Use almond bark instead of candy melts if that’s what you have on hand
Storage and Serving Tips
Store your Grinch Oreo Balls in an airtight container in the refrigerator for up to a week. Layer parchment paper between each row to prevent them from sticking together. These freeze beautifully too—arrange them in a single layer in a freezer-safe container with parchment between layers, and they’ll keep for up to three months. Thaw them in the fridge overnight or at room temperature for about 30 minutes before serving. They’re perfect for holiday parties, cookie exchanges, classroom treats, or packaging up as edible gifts. Stack them in a clear cellophane bag tied with a festive ribbon, or arrange them on a platter alongside other Christmas cookies for a colorful display.
Frequently Asked Questions
Can I use white chocolate instead of candy melts?
Yes, but you’ll need to temper it properly and add green gel food coloring to get the right color. Candy melts are easier to work with since they don’t require tempering.
How long do these need to chill?
At least two hours before dipping, and then another 15 to 20 minutes after coating to let the candy set completely.
Can I make these ahead of time?
Absolutely. Make them up to a week ahead and store them in the fridge, or freeze them for up to three months. They’re great make-ahead treats for busy holiday schedules.
Why did my candy coating seize up?
Either it got too hot or water splashed into it. Candy melts are very sensitive to moisture and heat. Start over with a clean, dry bowl and keep the heat low.
Where can I find red candy hearts?
Check Walmart, Hobby Lobby, Joann Fabrics, or online retailers. They’re seasonal, so stock up when you see them.
Can I use a different Oreo flavor?
Yes! Regular chocolate, golden, peppermint, or gingerbread Oreos all work well. Just avoid Double Stuf or Mega Stuf—they make the dough too wet.
Do I need a double boiler?
No. You can melt the candy melts in the microwave in 30-second intervals at 60% power, stirring between each round. Just be careful not to overheat them.
Grinch Oreo Balls
Ingredients
Method
- Line a large baking sheet with parchment paper and set aside.
- In a food processor, add red velvet Oreos and pulse until they become fine crumbs with no large chunks. Alternatively, place cookies in a zip-top bag and crush with a rolling pin.
- In a large mixing bowl, beat softened cream cheese with an electric hand mixer on high speed until smooth and fluffy, about 1 minute.
- Add Oreo crumbs to cream cheese and mix together until fully combined into a thick, slightly sticky dough.
- Using a 1.5-inch cookie scoop, scoop mixture and roll between palms to form smooth balls. Place on prepared baking sheet.
- Refrigerate for at least 2 hours until balls are firm and hold their shape.
- Reserve ½ cup candy melts for optional drizzle. In a double boiler over low heat, melt remaining candy melts, stirring frequently until smooth. Be careful not to overheat or allow water into the candy.
- Using a fork or toothpick, dip each chilled ball into melted candy, coating completely. Tap fork on edge of bowl to remove excess, then place back on parchment-lined sheet.
- Optional: Melt reserved ½ cup candy melts in piping bag or zip-top bag in microwave for 30 seconds. Massage until smooth, snip small corner, and drizzle over coated balls.
- Immediately press one red candy heart onto top of each ball before candy sets.
- Refrigerate for 15-20 minutes until candy coating is completely set. Store in airtight container in refrigerator.