
The first time a loaf of sourdough bread came out of my oven looking like something from an actual bakery, I stood there for a solid minute just listening. That crackling sound as the crust cooled was almost musical. My kitchen smelled like a warm, yeasty hug. I remember thinking this cannot possibly be something I made with my own two hands and a jar of bubbly flour paste. But it was. And honestly, that moment changed how I think about bread forever.
This whole sourdough bread journey started during a week when I had nothing but time and a bag of flour that needed using. No yeast packets. No bread machine. Just curiosity and a willingness to fail spectacularly. What happened instead was something almost magical. The dough transformed overnight into this pillowy, slightly sour, utterly satisfying thing that made store-bought bread feel like cardboard in comparison.
Making sourdough bread at home feels intimidating until you actually do it. Then you realize the process mostly involves mixing, waiting, and more waiting. The wild yeast does the heavy lifting. You just need to show up, feed your starter, and trust that time will work its quiet magic.
Creating Your Sourdough Starter from Scratch
Every good loaf begins with a living, breathing starter. This bubbly mixture of flour and water captures wild yeast from the air around you. Sounds almost mystical, but the science is straightforward. Combine flour and water, leave it out, and microorganisms naturally colonize the mixture. Within about a week of daily feeding, you have a vigorous starter ready to leaven bread without commercial yeast.
Gather these simple supplies before starting:
- All-purpose flour or whole wheat flour
- Filtered water at room temperature
- A glass jar tall enough to watch the rise
- Spoon for mixing
- Kitchen scale or measuring cups
The daily routine goes like this: mix equal parts flour and water, stir thoroughly, cover loosely, and let it rest on the counter. Next day, discard half and add fresh flour and water. Repeat this process for about seven days. The mixture will smell funky at first, maybe like nail polish or cheese. Keep feeding it. By day five or six, bubbles should appear consistently. When it doubles in volume within four to six hours after feeding and smells pleasantly tangy, your starter is ready for baking.
Essential Sourdough Bread Ingredients
The ingredient list for basic sourdough bread is almost laughably short. Four components. That’s it. Flour, water, salt, and your active starter. No sugar, no oil, no milk. Just the essentials that have been making bread for thousands of years.
Here’s what you need for one loaf:
- 500g bread flour or all-purpose flour
- 375g warm water
- 200g active sourdough starter
- 10g fine sea salt
Bread flour produces a chewier texture because of its higher protein content, but all-purpose works perfectly well if that’s what sits in your pantry. The starter must be active and bubbly, ideally used four to six hours after feeding. Test readiness by dropping a small spoonful into water. If it floats, the starter contains enough gas to leaven bread. Salt seems minor but contributes flavor and strengthens gluten structure. Never skip it.
Step by Step Dough Process
The method involves patience more than technique. Combine flour and warm water in a large bowl, mixing until shaggy and rough. Let this rest for thirty minutes uncovered. This autolyse step hydrates the flour and begins gluten development without any kneading. After resting, add the active starter and salt, then squish everything together until fully incorporated.
Over the next two hours, perform stretch and folds every thirty minutes. Grab one side of the dough, pull it upward gently, fold it over the center. Rotate the bowl ninety degrees and repeat. Four folds per session, four sessions total. This builds strength and structure without traditional kneading.
After the folds, cover the bowl and let the dough rise at room temperature for six to eight hours. It should double in size and look puffy with visible bubbles beneath the surface. In warmer kitchens, this happens faster. Cooler environments need more time. Trust your eyes more than the clock.
Shaping and Overnight Proofing
Once bulk fermentation finishes, gently turn the dough onto a lightly floured surface. Shape it into a round by tucking the edges underneath, creating surface tension across the top. The goal is a tight ball that holds its shape rather than spreading flat. Place the shaped dough seam-side up into a floured proofing basket or a bowl lined with a floured kitchen towel.
Cover loosely and refrigerate overnight, anywhere from eight to twelve hours. Cold fermentation slows yeast activity, allowing complex flavors to develop while the gluten relaxes. The dough becomes easier to score and springs dramatically in the hot oven. Plus, baking first thing in the morning means fresh sourdough bread before breakfast.
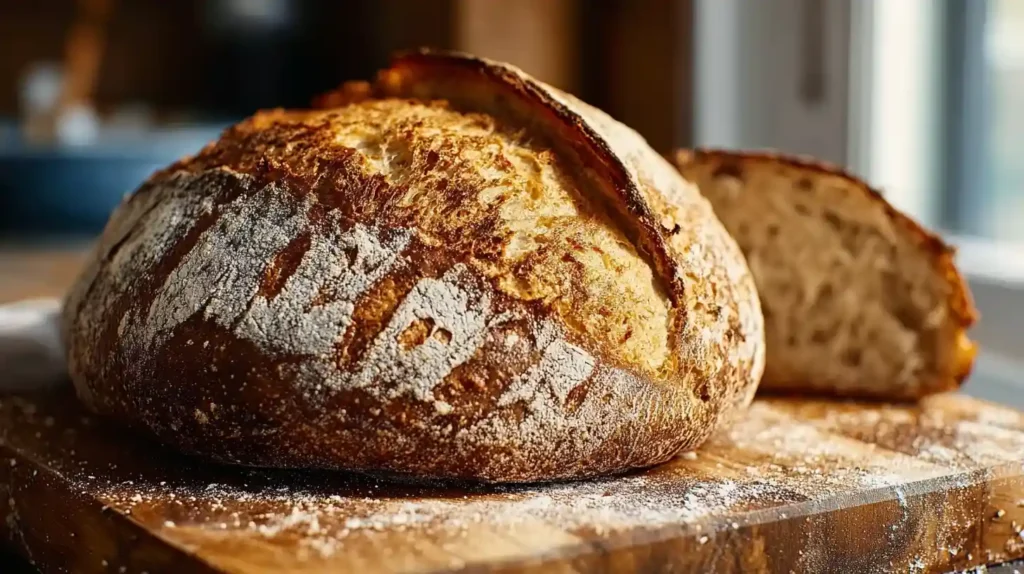
Cold dough going straight into a screaming hot oven creates that signature ear and crackly crust. The temperature differential produces maximum oven spring, pushing the scored opening upward into that gorgeous ridge bakers obsess over.
Baking Your Sourdough Bread
Preheat your oven to 450°F with a Dutch oven inside for at least thirty minutes. The preheated pot mimics a professional steam-injected oven, trapping moisture released from the dough during the initial bake. This steam keeps the crust pliable long enough for maximum rise before it sets and browns.
Turn the cold dough onto parchment paper. Score the top with a sharp blade or razor, making one confident slash about half an inch deep. Carefully lower the dough into the hot Dutch oven using the parchment as handles. Cover with the lid and bake for twenty minutes.
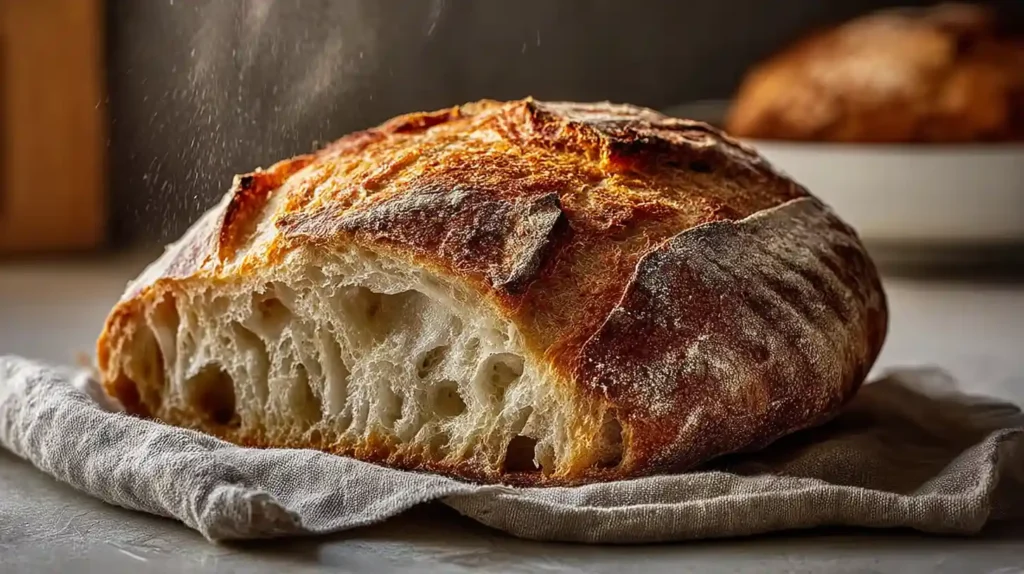
Remove the lid and continue baking for another twenty to twenty-five minutes until the crust turns deep golden brown. The internal temperature should reach around 205°F. Resist the temptation to slice immediately. Let the loaf cool completely on a wire rack for at least an hour. Cutting too soon releases steam and makes the interior gummy.
Pro Tips for Better Results
- Use warm water between 78-82°F to encourage fermentation without killing the yeast
- Weigh ingredients with a kitchen scale for consistent hydration levels
- Perform the stretch and folds gently to avoid degassing the dough
- Score confidently with one swift motion rather than multiple hesitant cuts
- Preheat the Dutch oven for the full thirty minutes to ensure maximum oven spring
- Let the starter reach peak activity before mixing for strongest rise
Delicious Sourdough Bread Variations
Once the basic recipe feels comfortable, experimenting becomes the fun part. Swap one cup of bread flour for whole wheat or rye to add earthier, nuttier flavors. The crumb becomes denser but deeply satisfying, especially toasted with butter.
Add-ins transform ordinary loaves into something special:
- Chopped olives and fresh rosemary for Mediterranean flair
- Shredded cheddar and minced jalapenos for savory heat
- Dried cranberries and toasted walnuts for a sweet-nutty combination
- Seeds like sesame, poppy, or sunflower pressed into the crust before baking
Fold add-ins gently during the final stretch session so they distribute evenly without deflating the dough. Keep total additions under one cup to avoid weighing down the rise.
Smart Substitutions
- Replace bread flour with all-purpose for slightly softer crumb
- Use half whole wheat flour for more nutrition and rustic flavor
- Swap water for whey leftover from yogurt making to boost tang
- Try spelt flour for a milder, sweeter loaf that stays tender longer
- Substitute rye for up to 30% of the flour for traditional European style
Troubleshooting Common Problems
Flat loaves usually mean weak gluten development or over-proofing. Make sure stretch and folds happen consistently during the first two hours. Check that bulk fermentation doesn’t extend too long in warm kitchens where dough can peak and collapse before shaping.
Dense, gummy interiors happen when the loaf comes out of the oven too soon or gets sliced before cooling. Internal temperature matters more than crust color. Use a thermometer and wait for 205°F before removing from the oven.
Starter that won’t bubble needs more frequent feeding or warmer environment. Try feeding twice daily for a few days. Whole wheat flour often kickstarts sluggish starters because it contains more wild yeast and nutrients than refined white flour.
Overly sour flavor develops when the starter over-ferments or sits too long past peak activity. Use your starter at its highest point, when it has doubled but not yet begun falling back down.
Storage and Serving Ideas
Fresh sourdough bread keeps best cut-side down on a cutting board or wrapped loosely in a kitchen towel at room temperature. Avoid plastic bags which trap moisture and soften the crust. Properly stored, it stays delicious for three to four days.
For longer storage, slice the loaf and freeze individual portions in freezer bags. Toast directly from frozen for quick breakfasts. The freezer preserves quality for up to three months.
Serve thick slices toasted with salted butter, avocado, or a drizzle of good olive oil. Day-old bread makes incredible French toast, croutons, or breadcrumbs. Nothing goes to waste when sourdough bread is involved.
Frequently Asked Questions
How long does it take to make sourdough bread from scratch?
From start to finish, expect about 24 hours of total time with only 30 minutes of active work. The rest involves fermentation and proofing while the dough develops flavor and rises naturally.
Can I use all-purpose flour instead of bread flour?
Absolutely. All-purpose flour produces excellent sourdough bread with a slightly softer crumb. The protein content differs, but the difference in home baking is subtle. Use whatever flour you have available.
Why does my starter smell like alcohol?
That smell indicates the starter is hungry and has consumed all available food. The liquid on top, called hooch, can be stirred back in or poured off. Feed immediately and maintain a more regular schedule going forward.
Do I need a Dutch oven to bake sourdough bread?
A Dutch oven creates ideal conditions but isn’t mandatory. Alternatives include baking on a preheated stone with a pan of water for steam, or using an inverted roasting pan as a lid during the first half of baking.
How do I know when the bread is fully baked?
The crust should be deeply golden brown and sound hollow when tapped on the bottom. For precision, insert an instant-read thermometer into the center. Internal temperature of 205-210°F indicates complete baking.
Can I reduce the sourness of my sourdough bread?
Yes. Use your starter at peak activity before it starts falling. Shorter fermentation times and warmer proofing environments produce milder flavor. Cooler, longer ferments intensify the tang.
How often should I feed my starter if I bake weekly?
Store the starter in the refrigerator and feed once per week. Remove it the day before baking, feed it, and let it reach peak activity at room temperature before mixing into dough. This maintenance schedule keeps the starter healthy without daily attention.

Sourdough Bread
Ingredients
Method
- Combine flour and warm water in a large bowl. Mix until no dry flour remains. Cover and let rest for 30 minutes (autolyse).
- Add active sourdough starter and salt to the dough. Mix thoroughly by squeezing the dough through your fingers until fully incorporated.
- Perform stretch and folds every 30 minutes for 2 hours (4 sets total). For each set, grab one side of dough, stretch upward, fold over center. Rotate bowl 90 degrees and repeat 4 times.
- Cover bowl and let dough rise at room temperature for 6-8 hours until doubled in size with visible bubbles.
- Turn dough onto lightly floured surface. Shape into a round by tucking edges underneath to create surface tension. Place seam-side up in floured proofing basket.
- Cover loosely and refrigerate overnight (8-12 hours) for cold fermentation.
- Preheat oven to 450°F with Dutch oven inside for 30 minutes.
- Turn cold dough onto parchment paper. Score top with sharp blade in one confident slash about 1/2 inch deep.
- Lower dough into hot Dutch oven using parchment. Cover with lid and bake 20 minutes.
- Remove lid and bake additional 20-25 minutes until deep golden brown and internal temperature reaches 205°F.
- Cool completely on wire rack for at least 1 hour before slicing.