There is something quietly magical about pulling a pan of Gluten-Free Biscuits out of the oven—the way the kitchen suddenly smells warm and buttery, the hiss of steam when you crack one open, and that first bite where the flaky top gives way to a tender, cloud-soft center. If you have ever missed classic biscuits since going gluten-free, this recipe is designed to bring that feeling back in the most comforting way. These biscuits rise tall, bake up golden, and stay soft enough to split with your fingers and slather with jam, honey, or gravy.
When my family first switched to gluten-free baking, biscuits were the one thing that never felt “right.” They were either crumbly, flat, or oddly chewy. After more test batches than I can admit, this version finally delivered exactly what I’d been craving: a dough that comes together in minutes, holds its shape, and creates real layers you can see and feel. Once you learn a few simple tricks—keeping everything cold, handling the dough gently, and shaping it without a rolling pin—you will have a dependable gluten-free biscuit recipe you can lean on for busy mornings, holiday dinners, and every cozy weekend in between.
Ingredients For The Best Gluten-Free Biscuits
These Gluten-Free Biscuits use everyday pantry ingredients, but the way they work together is what gives you lift, structure, and that buttery, tender crumb. A good gluten-free all-purpose flour blend with starches and a bit of structure is key for biscuits that hold their shape instead of spreading or crumbling. Xanthan gum (if your blend does not already include it) helps mimic the elasticity of gluten so the biscuits bake up tall and cohesive rather than dry and fragile.
Baking powder and a touch of sugar support the rise and balance the savory flavor, while salt rounds everything out. Very cold butter is what creates pockets of steam in the oven, which translates into visible flaky layers. Buttermilk adds gentle tang and moisture so the crumb stays soft, and a single egg (or egg replacer) gives extra richness and helps the biscuits brown beautifully. A little extra gluten-free flour is used just for shaping on parchment so you can handle the dough without making it tough.
Step-By-Step: How To Make Gluten-Free Biscuits
Start by preheating your oven to a hot 450°F (232°C) so the biscuits get an immediate blast of heat and rise quickly. Lightly grease a large cast-iron skillet or a sturdy baking sheet and set it aside. In a mixing bowl, whisk together your gluten-free flour blend, xanthan gum (if needed), baking powder, salt, and sugar until everything looks evenly combined and no pockets of leavening remain. This quick whisking step makes sure the biscuits rise evenly instead of in random spots.
Cut your cold butter into small cubes and chill it briefly in the freezer so it stays firm while you work. Toss the butter into the dry ingredients, then use a pastry cutter or the back of a fork to work it in until the mixture looks like coarse crumbs with pea-sized bits of butter still visible. In a separate cup, whisk together the buttermilk and egg, then pour this mixture into the flour-butter base. Gently stir just until a sticky, shaggy dough forms; it should look a bit rough, not smooth. Overmixing is the quickest way to turn tender biscuits into dense ones.
Sprinkle a tablespoon of gluten-free flour onto a sheet of parchment paper and scrape the dough onto it. Dust the top with another light sprinkle of flour and gently pat it into a thick round, about 7 inches across and roughly 1 inch tall, without using a rolling pin. Fold the dough in half over itself, then fold it once more; this quick stacking step is what builds those lovely layers. Pat it back into a thick round and use a 2-inch biscuit cutter, the rim of a drinking glass, or a mason jar lid to stamp out biscuits, pressing straight down instead of twisting so they can rise straight up in the oven.
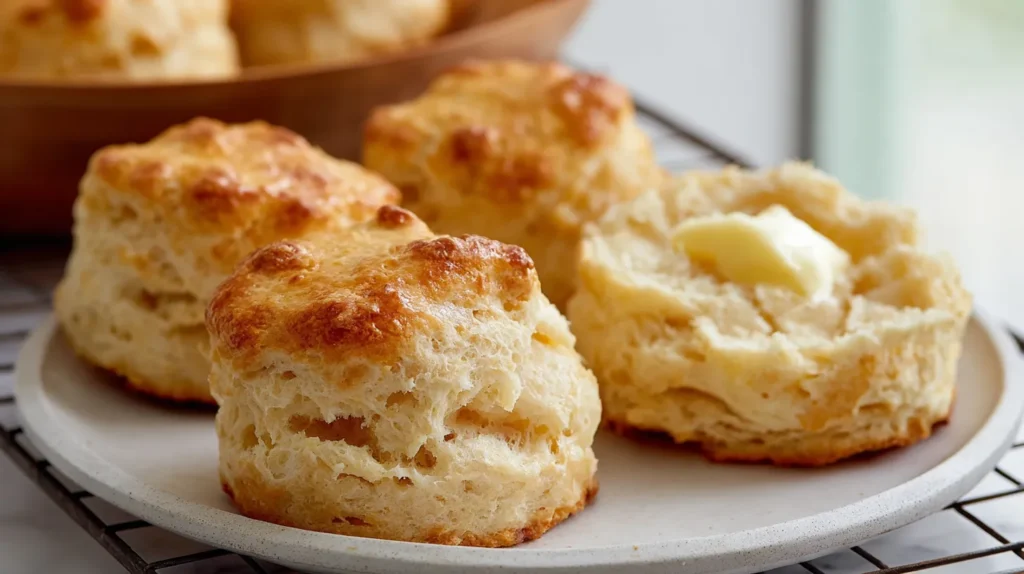
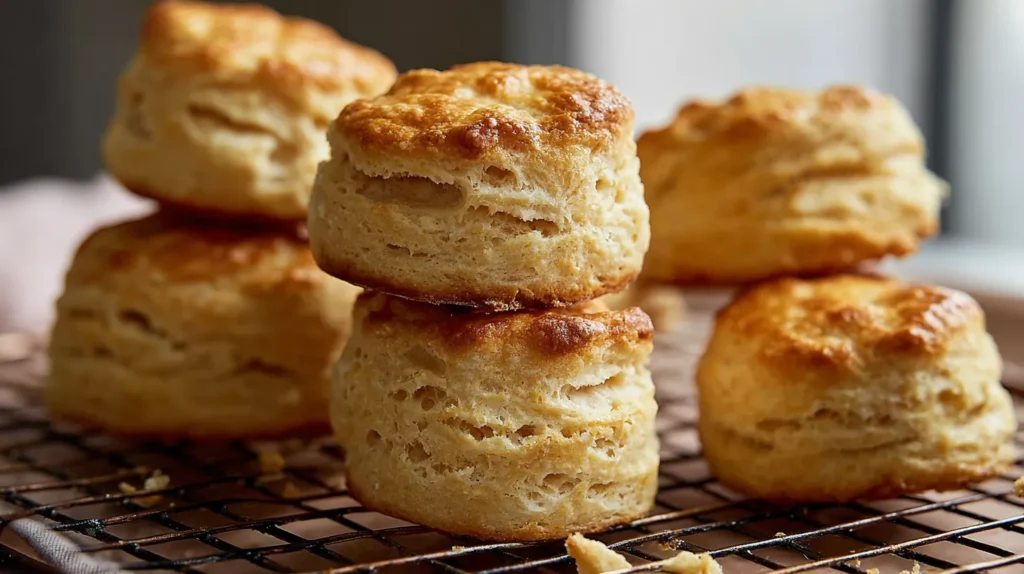
Arrange the biscuits close together in your prepared pan or on the baking sheet—you should get about 12 medium biscuits from this batch. Slide them into the hot oven and bake for 15 to 20 minutes, checking around the 15-minute mark. When the tops are deeply golden and the biscuits feel light when lifted with a spatula, they are ready. As soon as they come out, brush the hot tops with melted butter for extra flavor and shine, then serve while they are still warm and fragrant.
Pro Tips For Tall, Fluffy Gluten-Free Biscuits
- Keep your ingredients cold. Chill the butter and even the flour if your kitchen runs warm so the fat stays solid until it hits the oven, where it turns into steam and creates height and layers.
- Handle the dough gently. Think “pat and fold” rather than kneading; overworking gluten-free dough makes it tough and can knock out the air pockets you need for a tender crumb.
- Cut straight down, never twist. Twisting the cutter seals the edges and can stop the biscuits from rising properly.
- Pack the biscuits close together in the pan. Snuggling them side by side encourages them to climb upward instead of spreading outward.
Variations You Can Try
Once you have this base recipe for Gluten-Free Biscuits mastered, it becomes a canvas for all kinds of flavors and occasions. For a savory version, fold in shredded sharp cheese, minced garlic, or chopped fresh herbs like chives or rosemary before you add the buttermilk mixture. These make amazing sides for soups and stews or a cozy base for sausage gravy.
For breakfast biscuits that feel a bit more indulgent, stir in a spoonful of honey or a pinch of cinnamon and nutmeg, then serve them with fruit preserves or fresh berries. You can also shape the dough slightly larger and use the biscuits as sandwich buns for breakfast sandwiches loaded with eggs and bacon. If you prefer drop biscuits, scoop mounds of the dough directly onto the baking sheet instead of cutting, and bake until golden.
Substitutions And Dietary Swaps
This recipe is flexible enough to fit several dietary needs without losing its comforting biscuit texture. For dairy-free biscuits, use a neutral dairy-free milk (like almond, cashew, or oat) and stir in a tablespoon of lemon juice or white vinegar to create a quick “buttermilk” substitute. Pair it with a dairy-free buttery spread or baking-safe vegan butter for the fat component. The flavor stays rich, and the biscuits still brown nicely.
If you need egg-free biscuits, replace the egg with a reliable commercial egg replacer prepared according to the package directions, or use a thick flax “egg” made from ground flaxseed and water. Be sure your gluten-free flour blend is certified gluten-free and free from any allergens you avoid. For a slightly lighter texture, you can swap a small portion of the flour for a starch like tapioca or cornstarch, but do not reduce the total flour amount or the dough may become too wet.
Troubleshooting Common Biscuit Issues
If your Gluten-Free Biscuits turn out flat, the most likely culprit is warm butter or a dough that has been handled too much. Make sure the butter is cold going into the flour and that your oven is fully preheated so the biscuits get that initial burst of heat. Also, double-check that your baking powder is fresh; old leavening loses power and will not lift the dough properly.
Dry or crumbly biscuits usually mean there was too much flour or not quite enough liquid. Rather than scooping flour straight from the bag, spoon it into the measuring cup and level it off so you do not accidentally pack it in. If the dough still looks very dry and will not come together, add a splash more buttermilk a little at a time until it forms a soft, sticky mass. On the other hand, if the dough spreads too much, gently pat in a teaspoon or two of extra flour until it holds its shape.
Storage And Serving Ideas
Fresh from the oven is when these Gluten-Free Biscuits truly shine, but leftovers keep surprisingly well with a little care. Let them cool completely, then store them in an airtight container at room temperature for up to two days. When you are ready to enjoy, rewarm them in a low oven or toaster oven for a few minutes until the edges crisp slightly and the centers feel soft again.
For longer storage, freeze baked biscuits in a single layer until firm, then transfer them to a freezer bag and keep for up to two months. You can also freeze unbaked biscuit rounds on a sheet pan, then bake them from frozen, adding a few extra minutes to the cook time. Serve warm biscuits with butter and jam, alongside chili or stew, or split them open and top with eggs, cheese, and breakfast sausage for a hearty weekend brunch.
Frequently Asked Questions About Gluten-Free Biscuits
- Can I make these biscuits ahead of time? You can cut the biscuit dough into rounds, freeze them on a tray, and then bake straight from frozen whenever you need fresh biscuits. Just add a few extra minutes to the baking time until the tops are golden.
- Do I have to use buttermilk? Buttermilk adds flavor and tenderness, but you can make a quick version by mixing dairy or dairy-free milk with a spoonful of lemon juice or vinegar and letting it sit for several minutes before using.
- Which gluten-free flour works best? A good quality gluten-free all-purpose blend designed for baking usually gives the most reliable results. Different blends absorb liquid differently, so if your dough is very wet or dry, adjust with a teaspoon or two of extra flour or milk as needed.
- Why didn’t my biscuits rise? Check that your baking powder is fresh, your oven is fully preheated, and you did not twist the cutter when stamping out biscuits. Also ensure the butter was cold so it could create steam and lift in the oven.
- How do I keep the biscuits from turning out gummy? Avoid overmixing the dough and measure liquids carefully. Let the biscuits cool for a few minutes before cutting into them so the crumb can set.
- Can I make these biscuits without a biscuit cutter? Yes. You can use the rim of a drinking glass, a mason jar lid, or simply pat the dough into a rectangle and cut squares with a sharp knife.
- Are these biscuits good for sandwiches? Absolutely. Shape them slightly larger and bake until golden, then slice and fill with breakfast ingredients, deli meats, or grilled vegetables for a satisfying gluten-free sandwich option.

Gluten-Free Biscuits
Ingredients
Method
- Preheat the oven. Set your oven to 450°F (232°C). Lightly grease a large baking sheet or cast-iron skillet and set aside.
- Combine dry ingredients. In a large bowl, whisk together the gluten-free flour, xanthan gum (if using), baking powder, salt, and sugar until evenly mixed.
- Cut in the butter. Add the cold butter cubes to the dry mixture. Use a pastry cutter or fork to work the butter in until the mixture looks like coarse crumbs with pea-sized pieces of butter throughout.
- Mix the wet ingredients. In a measuring cup or small bowl, whisk together the buttermilk and egg (or prepared egg replacer) until smooth.
- Bring the dough together. Pour the buttermilk mixture into the flour mixture and gently stir with a spoon or spatula just until a soft, sticky dough forms. Do not overmix; the dough should look shaggy.
- Shape the dough. Sprinkle a tablespoon of gluten-free flour onto a sheet of parchment paper. Scrape the dough onto the parchment, dust the top with a little more flour, and gently pat it into a round about 7 inches across and roughly 1 inch thick.
- Fold for layers. Fold the dough in half over itself, then fold it once more. Pat it back into a thick round of similar size and thickness to encourage flaky layers.
- Cut the biscuits. Use a 2-inch biscuit cutter or the rim of a glass to cut out biscuits, pressing straight down without twisting. Gather and gently press together scraps to cut remaining biscuits.
- Arrange and bake. Place the biscuits close together on the prepared baking sheet or skillet. Bake for 15–20 minutes, checking around 15 minutes, until the tops are golden brown and the biscuits feel light when lifted.
- Finish and serve. Immediately brush the hot biscuits with melted butter, if using. Let them cool for a few minutes, then serve warm.