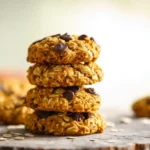
There’s something about unwrapping a candy bar that takes you right back to childhood. For me, it was always Butterfingers. That distinctive crunch, the way the flaky peanut butter center practically shattered against your teeth, followed by smooth chocolate melting everywhere. Pure joy in a wrapper. The problem? Those store-bought versions come loaded with ingredients I can barely pronounce, let alone feel good about eating regularly.
So I started experimenting. What began as a simple kitchen project turned into an obsession with recreating that exact texture and flavor using real ingredients. No corn syrup. No artificial anything. Just honest pantry staples transformed into something that tastes even better than the original. The first batch disappeared within hours, and my family has been requesting homemade Butterfingers for every gathering since.
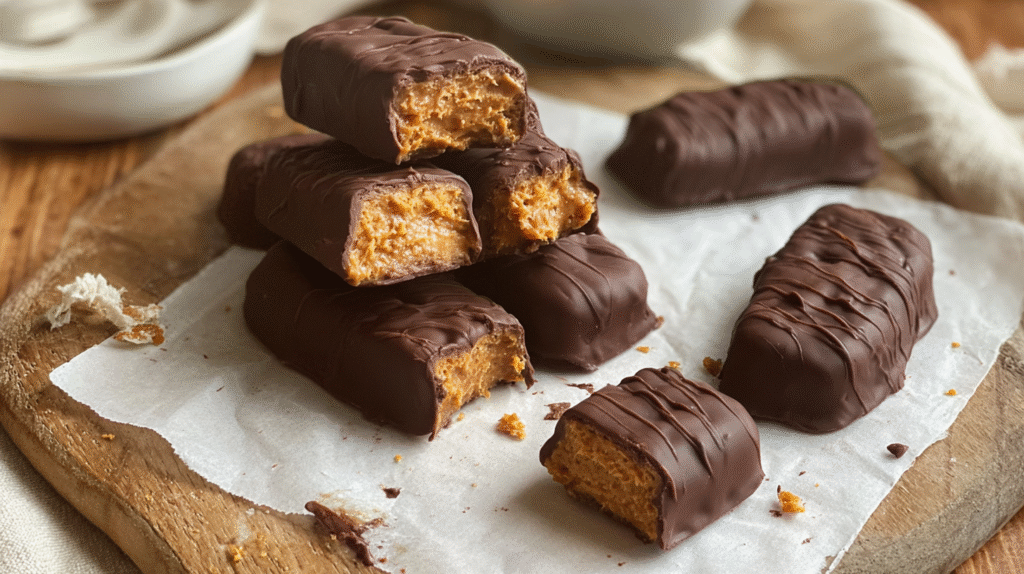
These little bars nail that sweet-salty balance perfectly. Crunchy cereal bits coated in warm peanut butter mixture, shaped into logs, and dunked in melted chocolate. The whole process takes barely any effort, and the results are genuinely impressive. One taste and you forget all about the candy aisle.
Why Homemade Butterfingers Taste Better
The magic happens when warm honey meets peanut butter. That combination creates a binding mixture that coats crushed cereal flakes and transforms them into something resembling the original candy’s signature texture. Real honey adds depth that corn syrup simply cannot replicate. The flavor becomes more complex, slightly caramelized, with natural sweetness that lingers without being cloying.
Texture is everything here. The cereal needs to be crushed but not pulverized. You want varied pieces that create that distinctive crumbly-yet-cohesive bite. Too fine and the filling becomes dense. Too chunky and it won’t hold together properly. Finding that sweet spot takes maybe thirty seconds of mixing, but it makes all the difference in the final product.
Quality chocolate transforms good into exceptional. Using real chocolate chips or chopped chocolate rather than candy melts gives these homemade Butterfingers a professional finish. The coating snaps cleanly and provides that satisfying contrast against the soft, flaky interior. Worth the extra minute it takes to melt properly.
Ingredients You Actually Need
Seven ingredients. That’s genuinely all these require. No specialty items, no hunting through health food stores. Everything probably sits in your kitchen right now.
- 1 cup natural peanut butter (creamy works best)
- 1/3 cup honey
- 1/2 teaspoon pure vanilla extract
- 1/2 teaspoon fine sea salt
- 1 3/4 cups cornflake cereal
- 1 cup chocolate chips
- 1 teaspoon coconut oil
Natural peanut butter without added sugar produces the cleanest flavor. The kind where you see oil separation at the top works perfectly. Stir it well before measuring. Honey quality matters here since it provides primary sweetness. Raw honey or wildflower varieties add interesting flavor notes, though any type delivers delicious results.
For the cereal, generic cornflakes work identically to name brands. Some people prefer using rice crispy cereal for a different texture, but cornflakes give that authentic Butterfinger crumble. The coconut oil helps thin the chocolate for easier dipping and creates a shiny, professional-looking shell.

Making the Peanut Butter Base
Start with a medium saucepan over low heat. Patience matters here because peanut butter scorches easily and burned peanut butter ruins everything. Add the peanut butter and honey together, stirring constantly as they warm. After two to three minutes, the mixture becomes glossy and completely smooth. That’s when vanilla and salt go in.
Remove from heat immediately after stirring in the flavorings. The residual warmth handles the rest. Pour this warm mixture over the cornflakes in a large mixing bowl. Here’s where the fun begins. Use a spatula or wooden spoon to fold everything together, pressing gently as you mix. The cereal should break into smaller pieces naturally.
Work quickly while the mixture stays warm because it becomes harder to shape as it cools. Some pieces will be bigger, some smaller, and that variation creates authentic texture. Once every flake gets coated and the mixture holds together when pressed, shaping time begins.
Shaping and Freezing
Scoop portions about the size of a golf ball and roll them into log shapes roughly three inches long. The mixture is sticky, so lightly oiled hands help tremendously. Don’t stress about perfection. Slightly irregular shapes look homemade in the best possible way and nobody cares once they bite into one.
Line a baking sheet or large plate with parchment paper and arrange the logs with space between each one. The freezer does critical work here, firming everything enough for chocolate dipping. One hour minimum, though longer doesn’t hurt. Fully frozen centers prevent the chocolate from sliding off during coating.
This freezing step cannot be rushed. Soft fillings absorb heat from melted chocolate and create a goopy mess. The extra patience pays off with clean, evenly coated homemade Butterfingers that look like they came from a professional candy kitchen.
Chocolate Coating Perfection
Melt chocolate chips with coconut oil using short microwave bursts. Twenty seconds at a time, stirring between each, prevents scorching. The chocolate should flow smoothly off a spoon when ready. Too thick means more melting needed. Too hot and it will seize. Gentle and gradual wins this race every time.
Drop each frozen log into the melted chocolate and roll it around using two forks. Lift carefully, tap gently against the bowl rim to shake off excess, then return to the parchment-lined sheet. Work efficiently because frozen fillings warm quickly at room temperature.
Back into the freezer for ten minutes sets the chocolate completely. The coating should look shiny and feel firm to the touch. That gorgeous snap when you bite through? That’s how you know the process worked perfectly.
Pro Tips for Best Results
- Use a food scale for consistent portion sizes if uniformity matters to you
- Work in small batches when dipping to prevent chocolate from cooling
- Add a pinch of flaky sea salt on top before chocolate sets for elevated flavor
- Keep hands slightly damp rather than oiled if sticking becomes problematic
- Let peanut butter mixture cool slightly before adding cereal for less breakage
- Rewarm chocolate gently if it thickens during the dipping process
Delicious Variations to Try
Almond butter creates an entirely different flavor profile that works beautifully with dark chocolate coating. The earthier nut taste pairs wonderfully with a touch of maple syrup instead of honey. Sunflower seed butter makes these completely nut-free for allergy-conscious households while maintaining that same satisfying texture.
Mix things up with different cereals too:
- Rice crispy cereal for lighter, airier texture
- Crushed pretzels for extra salt and crunch
- Graham cracker crumbs for a more cookie-like center
- Combination of cornflakes and puffed rice for varied texture
White chocolate or peanut butter chip coating offers a sweeter alternative. Some people drizzle contrasting chocolate over the set coating for a decorative finish that looks incredibly impressive at parties.
Smart Substitutions
- Replace honey with maple syrup or agave for vegan options
- Swap peanut butter for any nut or seed butter based on preferences or allergies
- Use dairy-free chocolate chips to keep these completely plant-based
- Substitute refined coconut oil if you prefer no coconut flavor
- Try brown rice syrup for a less sweet version with similar binding properties
Troubleshooting Common Issues
Filling too crumbly usually means insufficient peanut butter mixture or overly crushed cereal. The ratio needs enough sticky binding to hold everything together. Try adding another tablespoon of peanut butter and mixing thoroughly before giving up on a batch.
Chocolate sliding off happens when fillings aren’t frozen solid enough. Return them to the freezer for another thirty minutes and try again. Working too slowly can also warm the centers, so keep undipped pieces in the freezer until ready for their chocolate bath.
Dull, streaky chocolate coating indicates temperature problems. Chocolate that’s too hot or was cooled and reheated loses its temper. Starting fresh with new chocolate often solves this faster than troubleshooting a problematic batch.
Overly sticky mixture that won’t shape properly needs more cereal. Add small amounts, mixing thoroughly between additions, until the consistency allows easy handling without excessive sticking.
Storage and Serving
These homemade Butterfingers store beautifully in the refrigerator for up to two weeks, though they rarely last that long. The cold keeps the chocolate firm and the filling perfectly crispy. Let them sit at room temperature for about five minutes before serving for the best eating experience.
Freezer storage extends shelf life to two months. Layer between parchment paper in an airtight container to prevent sticking. Frozen Butterfingers taste incredible straight from the freezer if you enjoy extra-crunchy candy.
Serve these at parties by cutting them into bite-sized pieces for easier sharing. They make fantastic additions to dessert boards, holiday cookie trays, or gift boxes. Wrapping individual bars in wax paper creates charming presents for teachers, neighbors, or anyone who appreciates homemade treats.
Frequently Asked Questions
Can I use crunchy peanut butter instead of creamy?
Creamy peanut butter works better because it creates smoother binding with the honey. Crunchy varieties add interesting texture but may result in a slightly looser mixture that’s harder to shape into logs. If using crunchy, you might need to crush the cereal a bit finer for proper cohesion.
How do I make these completely dairy-free?
Use dairy-free chocolate chips, which are widely available in most grocery stores now. Check that your peanut butter contains no milk derivatives. Everything else in this recipe is naturally dairy-free, so the swap is simple and the results taste identical.
Why did my chocolate coating turn white?
White streaks or spots on chocolate indicate blooming, which happens when chocolate experiences temperature fluctuations during storage. The candy is still safe to eat and tastes fine, but appearance suffers. Storing at consistent refrigerator temperature prevents this issue.
Can I make these without freezing?
Technically yes, but results won’t be as clean. Chilling in the refrigerator for at least two hours provides minimal firmness for dipping. Freezing remains the recommended method for best texture and easiest chocolate coating application.
How do I prevent the filling from being too sweet?
Reduce honey by one to two tablespoons and increase the salt slightly. Using darker chocolate for coating also balances sweetness with bitterness. Unsweetened peanut butter with no added sugar helps control overall sweetness levels.
Are these safe for kids with nut allergies?
Not as written, since peanut butter is the main ingredient. Substitute sunflower seed butter or soy nut butter for a nut-free version that tastes remarkably similar. Always verify all ingredient labels for potential cross-contamination if allergies are severe.
Can I double this recipe?
Absolutely. These scale up easily for parties or gift-giving. Use a larger bowl and work in batches if your microwave can’t handle doubling the chocolate at once. The freezing and dipping process just takes proportionally longer with more pieces.

Homemade Butterfingers
Ingredients
Method
- In a medium saucepan over low heat, combine peanut butter and honey. Stir constantly for 2-4 minutes until smooth and warmed through.
- Remove from heat and stir in vanilla extract and sea salt until well combined.
- Pour warm peanut butter mixture over cornflake cereal in a large mixing bowl. Stir and press until cereal is coated and partially crushed.
- Shape mixture into 12-14 logs, about 3 inches long. Place on a parchment-lined baking sheet.
- Freeze for at least 1 hour until firm.
- Melt chocolate chips and coconut oil in microwave in 20-second intervals, stirring between each, until smooth.
- Dip each frozen log into melted chocolate, allowing excess to drip off. Return to parchment-lined sheet.
- Freeze for 10 minutes until chocolate sets. Store in refrigerator or freezer.