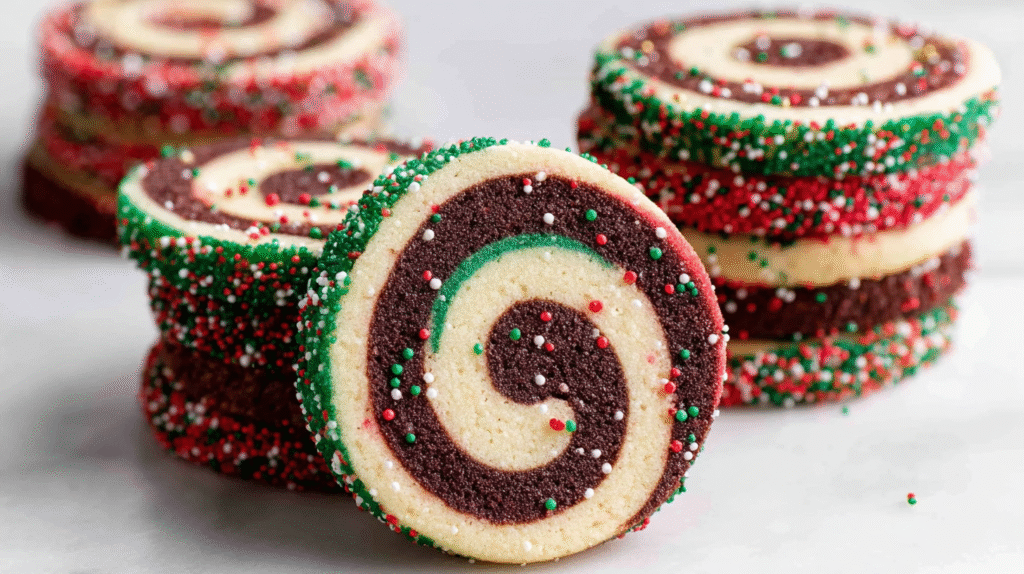
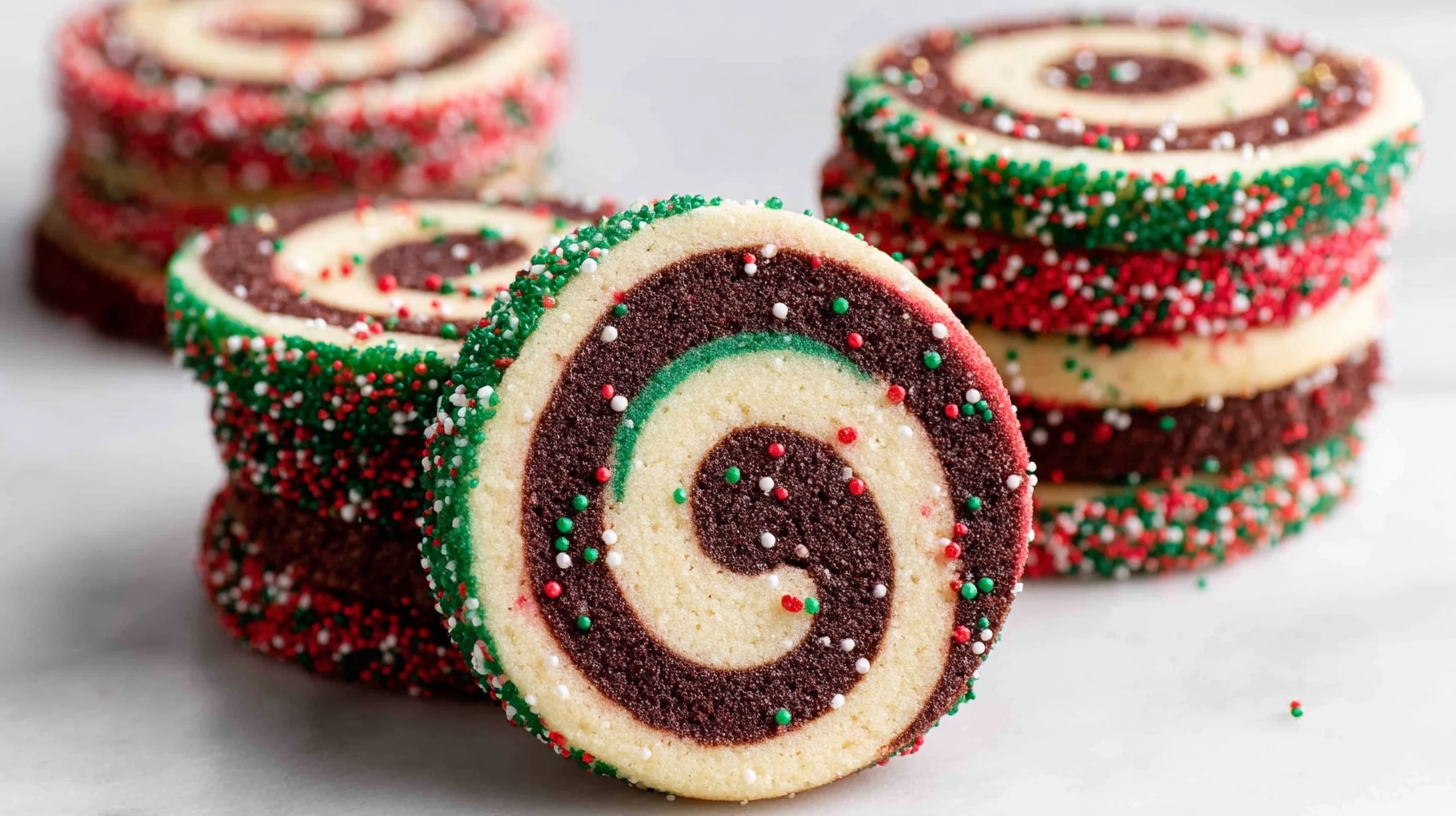
There’s something almost hypnotic about slicing into a log of Pinwheel Cookies dough and watching those perfect swirls reveal themselves. I made my first batch years ago for a holiday cookie exchange, mostly because I wanted something that looked impressive without requiring any decorating skills. The process felt almost meditative—rolling out two different colored doughs, stacking them together, rolling them into a tight spiral, and then chilling everything until it was firm enough to slice. When I pulled that first tray out of the oven and saw how the chocolate and vanilla spirals had held their shape perfectly, I felt like I’d just pulled off a magic trick. My kids were fascinated by them, insisting on helping me roll the next batch. These Pinwheel Cookies have become a December staple in our house, not just because they taste incredible, but because making them feels like a little holiday ritual. The dough does most of the heavy lifting—you just slice, bake, and try not to eat them all before anyone else gets a chance.
What Makes Pinwheel Cookies Special
The appeal of these cookies is how they manage to look intricate while being surprisingly straightforward to make. You start with a basic sugar cookie dough, divide it in half, and flavor one portion with cocoa powder or food coloring while leaving the other plain or tinted a different shade. Once both doughs are rolled out into thin rectangles, you stack them, roll them into a tight log, and chill. The chilling step is crucial—it firms up the dough so you can slice clean rounds without the layers smooshing together. The optional step of rolling the log in colorful nonpareil sprinkles before slicing adds a festive rim that makes each cookie look like it came from a bakery. The result is a cookie with a tender, buttery crumb and a visual wow factor that makes them perfect for gift boxes and holiday platters.
Ingredients for Pinwheel Cookies
The ingredient list is simple and likely already in your pantry. You’ll need 2¾ cups of all-purpose flour, half a teaspoon of baking powder, and half a teaspoon of salt for the dry ingredients. For the wet ingredients, grab 1 cup of softened unsalted butter, 1½ cups of granulated sugar, one large egg, and 2 teaspoons of vanilla extract. To create the chocolate swirl, you’ll need 3 tablespoons of unsweetened cocoa powder. If you want to make red and white pinwheels instead of chocolate and vanilla, skip the cocoa and use red gel food coloring instead. Finally, have about a quarter cup of colorful nonpareil sprinkles on hand if you want to coat the outside of the dough log before slicing—this step is optional but adds a fun pop of color and texture.

How to Make Pinwheel Cookies
Mix the Dough
In a medium bowl, whisk together the flour, baking powder, and salt. Set this aside. In a large mixing bowl, beat the softened butter and sugar together with an electric mixer on medium speed until the mixture is light and fluffy—this takes about three minutes. Add the egg and vanilla extract, then beat until everything is fully combined and smooth. Gradually add the dry ingredients to the wet ingredients, mixing on low speed until a soft dough forms. Once the dough comes together, divide it in half.
Color the Dough
Leave one half of the dough plain or add a few drops of food coloring if you’re making a colored version. For the other half, add the cocoa powder and knead it in by hand until the dough is evenly chocolate-colored with no streaks. If the cocoa makes the dough too dry or crumbly, add a teaspoon of milk or water at a time until it’s pliable again. Shape each dough half into a flat disc, wrap them in plastic wrap, and refrigerate for about 30 minutes. This initial chill makes the dough easier to roll out without it sticking to your work surface.
Roll and Stack
On a lightly floured surface or between two sheets of parchment paper, roll out each dough disc into a rectangle roughly 10 inches by 12 inches. Try to keep them about a quarter-inch thick and as even as possible. Carefully place one rectangle on top of the other, lining up the edges. Starting from one of the longer sides, tightly roll the stacked dough into a log, like you’re rolling up a jelly roll. The tighter you roll, the more defined your swirls will be. If the dough cracks as you roll, just press it back together—it’s very forgiving.
Add Sprinkles and Chill
If you’re using sprinkles, pour them onto a large sheet of parchment or waxed paper. Roll the dough log through the sprinkles, pressing gently so they stick to the outside. Wrap the log tightly in plastic wrap and refrigerate for at least four hours, or overnight. This long chill is essential—it firms up the butter in the dough so the cookies hold their shape when you slice and bake them. If you’re in a rush, you can freeze the log for about two hours instead.
Slice and Bake
Preheat your oven to 350 degrees Fahrenheit and line two baking sheets with parchment paper. Using a sharp knife, slice the chilled log into rounds about a quarter-inch thick. Place the slices on the prepared baking sheets, spacing them about two inches apart. Bake for 10 to 12 minutes, just until the edges are set and lightly golden. The centers will still look soft—that’s perfect. Let the cookies cool on the baking sheet for five minutes, then transfer them to a wire rack to cool completely.
Pro Tips
- Roll the dough tightly to create well-defined swirls with no gaps
- Chill the dough log for the full four hours before slicing for cleanest cuts
- Use a sharp knife and wipe it clean between slices to keep edges neat
- Don’t overbake—pull them when edges are just set but centers still look soft
- Roll dough between parchment sheets to avoid adding extra flour
- Freeze the dough log if you want to bake fresh cookies later
Fun Variations
- Make red and white pinwheels using red gel food coloring instead of cocoa
- Use green and white for a minty Christmas look, adding peppermint extract
- Try peanut butter dough with chocolate for a flavor twist
- Add orange zest to the vanilla dough for citrus notes
- Use different colored sprinkles for various holidays—pastels for Easter, orange and black for Halloween
- Make triple-colored pinwheels by stacking three thin layers instead of two
Troubleshooting Common Issues
If your dough cracks while rolling, it’s too cold—let it sit at room temperature for five minutes to soften slightly. If the swirls blur together when you slice, the dough wasn’t chilled long enough; pop it back in the fridge for another hour. Cookies that spread too much usually mean the dough was too warm when it went into the oven—make sure to keep the unsliced portion of the log in the fridge between batches. If the dough is too sticky to roll, add a tablespoon of flour at a time until it’s manageable. And if your log isn’t perfectly round, gently reshape it with your hands while it’s still slightly soft, before the final chill.
Ingredient Substitutions
- Use dairy-free butter and a flax egg for a vegan version
- Swap all-purpose flour for a 1:1 gluten-free baking flour
- Replace vanilla extract with almond or peppermint extract
- Use brown sugar instead of white for a slightly deeper flavor
Storage and Serving
Store your Pinwheel Cookies in an airtight container at room temperature for up to five days. They also freeze beautifully—layer them between parchment paper in a freezer-safe container and freeze for up to three months. The unbaked dough log can be frozen as well, wrapped tightly in plastic wrap and stored for up to three months. When you’re ready to bake, slice the frozen log and bake straight from the freezer, adding an extra minute or two to the baking time. These cookies are perfect for holiday cookie exchanges, gift boxes, and festive platters. Arrange them on a serving tray alongside other holiday cookies, or stack them in a clear cellophane bag tied with ribbon for easy gifting.
Frequently Asked Questions
Can I make these ahead of time?
Absolutely. Make the dough log up to three days in advance and keep it chilled in the fridge, or freeze it for up to three months. Baked cookies store well for up to five days.
How do I get perfect swirls?
Roll the dough tightly when forming the log, and make sure it’s thoroughly chilled before slicing. Use a sharp knife and wipe it clean between cuts.
Can I skip the sprinkles?
Yes, they’re completely optional. The cookies will still look beautiful with just the swirled pattern visible.
Why did my cookies spread?
The dough was too warm when it went into the oven. Keep the unsliced portion of the log in the fridge between batches to prevent spreading.
Can I make different colors?
Yes! Use gel food coloring to create any color combination you like. Red and white, green and white, and pink and white are all popular for different holidays.
How thick should I slice them?
About a quarter-inch thick works best. Thinner cookies will be crispier, while thicker ones will be chewier in the center.
Can I freeze the dough?
Yes. Wrap the log tightly in plastic wrap and freeze for up to three months. Slice and bake directly from frozen, adding a minute or two to the baking time.
Pinwheel Cookies
Ingredients
Method
- In a medium bowl, whisk together flour, baking powder, and salt. Set aside.
- In a large mixing bowl, beat softened butter and sugar with electric mixer on medium speed until light and fluffy, about 3 minutes. Add egg and vanilla extract, beat until combined.
- Gradually add dry ingredients to wet ingredients, mixing on low speed until soft dough forms. Divide dough in half.
- Leave one half plain (or add food coloring). To the other half, add cocoa powder and knead by hand until evenly chocolate-colored. If too dry, add milk 1 teaspoon at a time.
- Shape each dough half into flat disc, wrap in plastic wrap, and refrigerate for 30 minutes.
- On lightly floured surface or between parchment sheets, roll out each dough disc into 10×12-inch rectangle, about ¼-inch thick.
- Place one rectangle on top of the other, lining up edges. Starting from longer side, tightly roll stacked dough into log.
- If using sprinkles, roll log through sprinkles on parchment paper, pressing gently so they stick. Wrap log tightly in plastic wrap and refrigerate at least 4 hours or overnight.
- Preheat oven to 350°F (175°C). Line two baking sheets with parchment paper.
- Using sharp knife, slice chilled log into ¼-inch rounds. Place slices on prepared baking sheets, spacing 2 inches apart.
- Bake 10-12 minutes until edges are set and lightly golden. Centers will still look soft. Cool on baking sheet 5 minutes, then transfer to wire rack to cool completely.